Tuesday, September 20, 2022

Polar Bear Express


Quilt No. 142
August 2022

This quilt is proof that lightning can indeed strike twice in the same place. 

In 2017 I completed Polar Bear Dip, a Row by Row Experience block designed by Christina Doucette (Needleworks Studio, Cochrane, Ontario).  The pattern for that quilt block was a gift from a friend who decided to pursue other projects.  (You can read more about Polar Bear Dip and Row by Row here.)

In 2022 one of our older guild members felt it was time to pass her stash on to other quilters.  Two members helped out, fearlessly taking on the challenge of how to share this great gift.  They came up with a brilliant plan, placing patterns and projects that were in various states of completion into brown paper bags.  These were then randomly distributed at the guild. No peeking into the bag was allowed. 

When I opened my bag, I could see that the karma of the quilting universe had struck. I had received the pattern for the block Polar Bear Express, a companion piece to the Polar Bear Dip quilt I’d finished in 2017.  Not only was it from the same designer and shop, it had some fabrics that matched those I’d used in my previous quilt. Karma? Lightning? Quilt Gods?  Since the block had travelled though many hands to reach me, I set aside all other projects and made this block into a small quilt that can now hang with its companion.

Top: Polar Bear Dip
Bottom: Polar Bear Express

The town of Cochrane, possibly the only location with a world class live polar bear habitat, is steeped in polar bear motifs. To that end, they even have a polar bear painted on their water tower, so I’ve added a very tiny one to the water tower in this quilt.  It’s my belief that you can never have too many polar bears, even if they’re cloth ones.

Phone Call


Quilt No. 141
January 2022

You never know where a mere drawing will take you.  In this case it took this quilt all the way to Quilt Canada’s National Juried Show 2022.

I like to doodle while I’m talking on the phone.  Since my rational brain is taken up by conversation, the doodles I make are far more varied than the ones I actually “think” about. After I’d amassed quite a few of these during my Tuesday night phone calls with my sister, I thought it might be interesting to see if I could cobble them together into a cohesive whole. I also thought this might be a good subject for the guild’s challenge - to do a monochromatic quilt.  That’s a quilt that’s made from one colour and its variations. These two criteria proved to be ridiculously challenging, akin to climbing Everest in bedroom slippers and a tiara.

First came the design, where I took all the doodles I wanted to use and, using tracing paper, fitted them together onto a large sheet of grid paper. I kept moving the outline shapes around. I also kept adjusting them into recognizable objects.  What can I say – in my mind anything abstract is simply an exercise in modifying it into a “real” object.  So, things morphed, and an apple and a globe and several other doodles from the first design did not make the cut as it evolved to include a dragon, an armadillo, a black fish, a school of fish, a snake, an alien, and even an embryo.  How all these items are connected is a story yet to be revealed. Even to me.

The monochromatic part did not work out, as I had begun using fabric that varied in colour gradation from pink to purple.  It worked so well for this design that I just gave in to it and turned my monochromatic efforts to another quilt, My Mother’s Cats.

To bring this quilt to life, it required an intense amount of detailed stitching, with satin stitching around many of the shapes and minutely spaced machine quilting over the entire surface.  A three-dimensional flower was finally crafted after numerous attempts, giving the quilt a much-needed focus. I filed all the failed flower attempts with my bedroom slippers and tiara, in the Probably Never Box.


Sunday, September 18, 2022

Under Way


Quilt No. 140
March 2022

Most organized groups of quilters pose challenges for their members.  These are generally fun and always optional, designed to get your creative juices and motivation beefed up. You don’t necessarily have to twist yourself into a knot to come up with your own challenge quilt, you can pass and no one will mind.  However, some of the most strenuous challenges come from completely innocuous places.  Under Way, was just that. It was a self-challenge. No group, just me. There was nowhere to hide, no chair in which I could bask while others took the lead and wowed me with their beautiful creations.

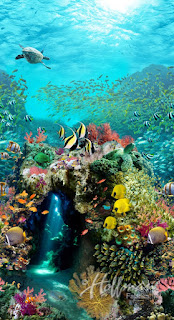
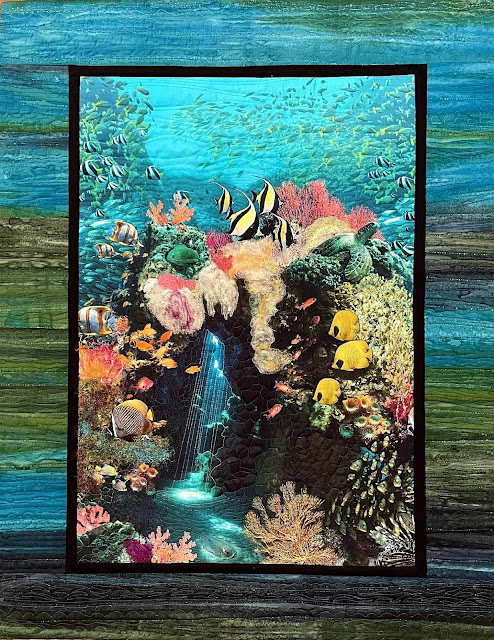
Beneath the Waves Panel
It began with a fabric panel gifted to me by my friend Ruth.  A “panel” is generally a picture printed on fabric, designed to be used as a whole piece.  It may depict a scene such as a landscape, or a bouquet of flowers, or a cute grouping of animals begging to be made into a baby quilt.  It might be horses, or maybe a Halloween or Christmas scene, with Santa or snowmen as the top favourites. 

This quilt was made from the Hoffman Fabrics panel, Beneath the Waves.  A panel may have a scene that stretches across the whole 40 inch width of the fabric, or, as in the case of Beneath the Waves, there may be two identical panels printed across the width.  So, I received not one but two copies of this stunning fabric.  Stunning to the eye…and the brain.  It had tremendous colours and appeal, but I could not see how I might use it. 

After I’ve used or auditioned each fabric for a quilt, I place it in a basket, and when the depth of fabric in the basket is sufficient to become dangerous, I put all the fabrics away. New fabrics also get placed in this basket, to remind me of what I’ve been up to.  Beneath the Waves stayed in this basket for about five years – never being put away in case I forgot about it…but never being cooperative enough to suggest what I might do with it. 

During “COVID times” I had to resort to shopping in my own stash, and I kept pulling out this panel, pondering it, and returning it to the basket.  I even went so far as to cut the two identical panels apart. That was scary, so I folded them up and returned them to the basket, pretending I hadn’t done it.  As we dragged on into the second summer of the pandemic, I was running short of ideas, fabric inspirations, and, at times, chocolate. These were desperate days. 

The Waves panel had SO much going on at the bottom…and SO little going on at the top.  Combatting all that negative space at the top seemed impossible, so I cropped it off. I felt hopeful. I added batting and a fabric backing and began dutifully quilting it around the various fish and marine creatures.

Soon enough I had a certified dog’s breakfast. That shapes looked more jumbled, not less. It belatedly became clear to me that this piece was never intended to be quilted (Note to self: Not everything in the world can be quilted) (How sad)  Quilting around the objects had made a super busy piece even busier, less harmonious.  Could I throw in the towel on the self challenge?  The whole thing would be a failure!  As I continued to try to see where things had gone off the rails, I focused on how eye-bogglingly busy it was.  A cushion made from this unquilted fabric would be spectacular - a quilt, not so much.

I began to select areas that could be “cancelled” out by overpainting using Inktense Pencils.  These are dye-pencils that are capable of covering up small areas by changing the colour or covering the print of the fabric.  I was able to create calmer areas where my weary eyes could rest.  Some elements on the original panel were out of scale and I covered them as well.  I cut pieces from the second panel to add as stuffed appliques to make the turtle and a few of the fish into three dimensional shapes.  I extended areas of coral by quilting over wool roving, modified other areas with hairy yarn or lace or thread painting.  I finished it off by adding a black inner border and a wide outer border. 

Hopefully, I’d met the self-challenge, and my goals were met.  The fish were now swimming, instead of my eyes!
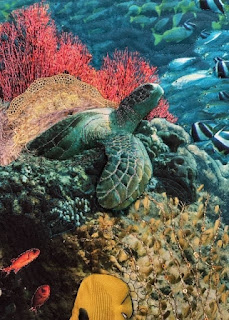
Close up of turtle

Another Ending

Quilt No. 139
February 2022

Is it possible that there could be another ending for Humpty Dumpty, one where he doesn’t end up broken and yolky?  We’ve heard a lot about his demise, and the fumbling efforts of the King’s horses and men fooling around with Elmer’s Glue.  It never ends well for anyone. 

Inevitably, we fail to back the story up to its crucial beginning.  Why did Humpty D have a great fall?  Was he just plain clumsy? Given his shape it seems plausible. But maybe there was a darker element, one we’re afraid to talk about.  Was he pushed? Engaging his fool hardy gene for risk taking? Bullied beyond despair? Too slippery for the wall?  He’s a deeper character than we’ve been led to believe. 

In my iteration of the Humpty Dumpty mythology, there is no fall, great or otherwise. H.D. is simply enjoying the forest, the flowers, and his animal friends.  A rainbow has come out to lend its approval. He is happy with himself and the world around him. He’s admirable, not broken.

Original Humpty Dumpty Doodle
Original Humpty Dumpty doodle

“Another Ending” began as a doodle that was made with no particular intent in mind, and was then tossed into a folder.  The brick fabric wall was created by using a tiny rectangle of sponge to stamp paint onto cloth.  It predated H.D. by at least ten years.  (My strategy of keeping every little bit of nonsense I create occasionally pays off.) The redwood trees were cut from an older rather unsuccessful quilt I’d made of a redwood forest. I willingly chopped up its trunks and branches, reimagining them for H.D.’s world. I endlessly patted myself on the back - I’d kept the unused “redwood” fabric pieces from that quilt for fifteen years.  You just never know what you’re going to stir together into a finished project…

In the end, all the bits and pieces that had been lazing around in limbo for years – the doodle, the brick fabric, the redwood quilt – came together. I like to think that they justify the clutter of boxes and drawers that house my collection of fabrics and past efforts.  And this newly imagined Humpty Dumpty agrees with me.

Saturday, September 17, 2022

Blackout


Quilt No. 138
October 2021

What does a city look like during a power blackout? What about a quilted city?  

I’ve always wanted to do a skyline of a blackout.  When I was given the gift of a package of “Stargazers” fabric (Robert Kaufman), I knew I had the brilliant starry sky fabric that could hold its own against the stark blackness of the unlit buildings.  For the darkest buildings I pillaged the black velvet I’d been hoarding in the back of the craft closet.  A sliver moon was added in with various pieces of cast-off jewelry and wool roving along the horizon. The tilt of the horizon? Well, that’s pretty much how we feel when our beloved and mostly taken for granted electricity is denied to us.

King of the Mountain


Quilt No. 137
October 2021

This quilt began as yet another chunk of Setacolor-painted fabric that was looking for a raison d’etre.  It was hanging out with its pals in a dark drawer, a place not known for its easy escape.  Once a piece hits that drawer, it generally stays there, sighing under the weight of newly added layers of unused dyed fabric.  

I wanted to attempt thread painting a pine tree, so I grabbed this piece of wintry fabric.  As the tree took shape, so did the background – suggesting a snowy mountain.  Eventually I completed the lonely tree on the somewhat aloof background.  It was all very sterile looking.  I had no plans to take it any further.

A cut-out snowman intended for another project mysteriously migrated onto the piece, and much to my surprise, brought the whole experiment to life. Instead of ending up in the pile of test bits doomed to anonymity, the piece now begged for the addition of borders, and I was happy to comply.  The King of the Mountain had claimed his realm.


Wednesday, December 8, 2021

Light at the End of the Tunnel - The Book!


Quilt No. 136
July 2021

I've finally reached my destination in my Light at the End of the Tunnel journey that I've described previously in the posts, Looking for Light, and Getting Started.

Having made 18 fictional characters into 5x5" quilt blocks it was time to come up with a plan for my Light at the End of the Tunnel challenge quilt.  The blocks would need to be assembled, and arranging them in a box didn’t count, not even if I put them in alphabetical order.  

A wall hanging quilt?  With over a hundred such quilts under my belt, the walls here are getting pretty full, and the padded cell décor is getting just the tiniest bit tiresome. I’m living in a fabric gulag. Also, a picture of each character wasn’t enough to convey why these imaginary people, dogs, angels, ducks, frogs, and gas stoves had not only mattered to me, but had guided me through many a ‘tunnel’ with their own brand of moralist fervor.  

I needed to find a way to help the powerful metaphor of the “tunnel” tell my stories.  Making the character blocks into a book became an obvious choice.  Each character would need an accompanying page of text with either a quote by or about that character, or what the character represented, or perhaps my thoughts on that character.  It was a monumental task - take eighteen things that are not real, and succinctly come up with their impact on my own personal reality. 


What follows are photos of each of the eighteen character blocks, accompanied by their explanatory text pages.  Some of the characters’ stories have been told in previous blog posts (Fever Foster, Nancy Drew, Beaky, Superman).  For the rest, their brief story - as told here - is no less meaningful.  You can click on the photos to enlarge them for easy reading.


Book Cover/Julie
Book Cover/Julie

Touslehead

The Galloping Gas Stove


Beaky the Greedy Duck

Rudolph The Red-Nosed Reindeer

Fairy Tales

Santa Claus

Charlie Brown

Snoopy

Fever Foster

Nancy Drew

Superman

Kermit the Frog

The Humanoids

Star Trek

Herbies

The Snowman

The Denton Bear

Frederick Frog

The Door/Quilt Label

The Open Door


Wednesday, October 20, 2021

How to Make the Tunnel Block Characters

Line drawing printed out
Stitching complete, paper removed, shading added

Briefly, the characters were created using these steps


5x5 inch squares of unbleached cotton, prepared as follows

Spray starch 2 -3 times

Sandwich layers, top to bottom:

Unbleached cotton

Fusible web

Fusible fleece

Fuse layers with iron

Backing is not added at this time

Next steps:

·       Choose a simple picture such as a line drawing, or one that can be easily be broken down into a line drawing

·        If you need to make a photo into a line drawing, follow these steps.

Ø  Print out the photo

Ø  Using a fine tipped Sharpie maker, trace it onto clear plastic to make a line drawing

Ø  Scan in the drawing

·       Create a text box in Word with the dimensions you want for your block, for example a 3.5x3.5” text box to place on a 5x5” block

·        Format the text box to use your drawing as the background - this will give you the correct size of the drawing

·        Print it out on regular computer paper

·        Pin the printed paper onto the prepared sandwiched layers

·        Free motion quilt along all lines using regular 40 wt thread, top and bobbin, using a very small stitch, and a fine needle. I used black thread, with a few exceptions.

·        Remove paper, using tweezers where necessary (tedious)

·        Pull all loose threads to the back using a hand sewing needle (even more tedious)

·        Outline stitching is now complete

·        Paint in the colour or shading using Derwent Inktense pencils and Liquitex Gel Medium